Posted on 2 Comments

Quorn Chicken Curry Recipe

Hello all,


This is my Quorn chicken curry recipe which I posted on Instagram a little while ago! Those that have tried it, have often been surprised that it’s not actual chicken. I’ve never tasted chicken, so I wouldn’t know! It’s a yummy curry and it’s super quick and easy to make and it’s also healthy and contributes to your protein intake. Quorn is low in fat and high in protein which is great for vegetarians and it comes in many forms.


To make the baby friendly version, simply omit the salt and green chilli and chop the chicken pieces in to smaller chunks. This is one of Arjun’s favourite Indian dishes.


Time taken: 20 minutes

Ingredients:

  • 450g Quorn chicken style pieces
  • ¾ tin chopped tomatoes
  • 2 green chillies
  • 1 large white onion
  • 5 cloves of garlic
  • A 4cm piece of ginger
  • 1 teaspoon cumin
  • 1 teaspoon turmeric (haldi)
  • 1 teaspoon red chilli powder
  • 1 teaspoon salt
  • ½ teaspoon garam masala
  • A generous handful of coriander


Method:

  1. Peel and chop the onion in to large sections and place in a food blender along with the peeled garlic and ginger and blitz.
  2. In a large deep pan, shallow fry the cumin on medium heat for 30-60 seconds until  brown but be careful to not burn them. Add the onions, garlic and ginger to the pan and cook until golden brown.
  3. Blitz the chopped tomatoes and add to the pan once ready. Cook on medium heat stiring until you see little bubbles at the sides of the pan.
  4. Blitz the green chillies and add to the mixture. Also add in the salt, red chilli and turmeric. Stir well for a few minutes.
  5. Add in the Quorn chicken style pieces and coat with the gravy generously.
  6. Add in boiled water to achieve the desired consistency.
  7. Add in the garam masala and chopped coriander and cover and leave to boil for 10-15 minutes stirring occasionally.


Voila!

Posted on 4 Comments

Baby Cinnamon and Banana Cookies Recipe

I spontaneously came up with this recipe by incorporating some of Arjun’s favourite foods – bananas and raisins. They are super quick and super easy to make and are full of nourishing goodness and Arjun loved them! 
Time taken: 20 minutes

Makes: 15 cookies 

  • Two handfuls of rolled oats
  • 2 ripe mashed bananas
  • 1 teaspoon honey 
  • 1/2 teaspoon ground cinnamon 
  • 2 tablespoons raisins

Method:

1. Pre heat the oven to 180c. Using a food blender, grind the rolled oats so they are a powdery texture. If you don’t want to grind them, leave them whole but you may require a little self raising flour to help bind the mixture better. 

2. Mix in the the cinnamon and honey and work the mashed banana in slowly to ensure a dough like consistency is achieved. Mix in the raisins. 

3. Roll out the dough gently. It may be a little sticky due to the bananas so use some flour to line the surface before doing so. 

  
4. Use a cookie cutter to cut in to desired shapes – we used transport cutters. Place on a lined baking tray and bake for 15 minutes on 180c or until lightly browned. 
  
5. Leave to cool for 10 minutes before serving. 

  
Serving suggestion: Arjun loves them with milk! 

Posted on 5 Comments

Mini Eggless Cheese and Onion Tofu Quiche Recipe

Hello all! 

I’ve had lots of messages requesting the recipe for these since I posted on Instagram and Facebook. My super talented and creative mother in law taught me the basis for this recipe. I’m really lucky to have two talented mummy’s who are brilliant cooks – I have hope with them as my teachers! 

These are egg free and taste absolutely divine! You’re also free to add in/substitute vegetables as you please. My mother in laws original recipe is cheese and onion. As you can see below I’ve added in a few extras.  

The cheesiness against the crunch of the pastry hits my craving for comfort food spot pretty quick! Given its a crustless recipe, it’s not as fattening as it tastes! It’s a quick and simple recipe which doesn’t go overkill with any herbs or spices. 

Makes: 50 mini quiches

Cooking time: 45 minutes
Ingredients

  • 350g firm tofu 
  • 170g Philadelphia (I used light) 
  • 60g medium cheddar cheese grated
  • 5cm piece of leek
  • 1 x small red onion
  • 2 small heads of broccoli 
  • Shortcrust pastry (I use jus Jus-Rol ready rolled) 
  • Pepper
  • Salt to taste (I added this after I’d made Arjun’s)

1) Drain the tofu thoroughly and crumble in a mixing bowl using the back of a fork. Add in the Philadelphia and mix well. Work in 40g of the cheddar cheese. 

2) Dice up the onion, leek and broccoli and mix in. Add in the salt and pepper and mix. 


3) Grease a mini cupcake baking tin and use a small round cookie cutter to make the base of the quiches. Place the bases in to the baking tin pushing down using your fingers. 

4) Fill each section with the tofu mixture you made smoothing the top. 


5) Sprinkle with remaining cheddar cheese and garnish with a sprig of broccoli. Place in the oven at 180c for 25 minutes. Leave to cool for ten minutes once cooked. Serve. 


Voila! 

Serving suggestion: homemade chips and baked beans 

  
Plate can be purchased Here (available in three different colours). 
Enjoy x 

For more information about our vegetarian weaning journey, click here.

Disclaimer: as when trying any new foods with your baby that you may be unsure about, please check with your health visitor first.

X

Cuddle Fairy
Free From 

Farmhouse
Posted on 1 Comment

UDI Vegetarian Gluten Free Chocolate Chip Muffins, Bagels & Pizza Base Review

Hello all,

When I was contacted by Michelle at UDI’s to review some of their gluten free range, I wasn’t going to say no! Firstly, food is one of my biggest passions (in case you hadn’t noticed!) and secondly, I often opt for gluten free breads as I struggle to digest too much wheat without feeling awful afterwards.

I was super excited when I received my special delivery in the post which consisted of freshly baked gluten free chocolate chip bagels, freshly baked gluten free chocolate chip muffins and gluten free pizza base. When I opened the box, it smelt amazing!

You can purchase all these products from Tesco and all leading supermarket chains.

I’m always a little apprehensive about trying gluten free goods as I always assume they won’t taste as good as the real deal .. Here are my thoughts on the products I was sent.

Gluten Free Chocolate Chip Muffins


I love a bit of chocolate cake so was looking forward to trying these!

They looked delicious and fluffy in texture and as we split open the packet, they smelt divine!

They were surprisingly better tasting than a regular chocolate chip muffin. They were really moist although the texture wasn’t as fluffy as a regular muffin, it was a little more dense like with many gluten free products.

The double chocolate chips were a chocoholics dream as they made the cake taste even more rich and dreamy.

Overall, we really liked this product and would recommend it to those with a big sweet tooth!

Gluten Free Chocolate Chip Bagel 


Arjun decided to join in with the review of these – the little monkey helped himself to a bagel before we knew it! He pretty much had one every other day till they were finished! He definitely loved them. Pre warning, the chocolate goes everywhere, so be armed with wipes if your little one likes to walk around with food in their hands whilst snacking!


These were dense in texture compared to a normal bagel and although they tasted different, they didn’t taste bad. I had my first one with a cuppa without toasting and it tasted similar to a fruit cake with chocolate chip – not too sweet, just right.
The second time, Preetam and I both had one which we toasted – I had mine with Nutella (obviously!) and he had his with peanut butter. They taste a lot nicer when toasted and topped. I didn’t feel lethargic and bloated after eating these like I do with regular bagels.


All in all, these were a hit in our home and we managed to get through two packets in 8 days between the three of us!
Gluten Free Pizza Base


As most of you will probably know, pizza is one of my most favourite foods so I was super excited to try this. I decided to save it for a rainy day when I was craving comfort food and that day was last Wednesday!


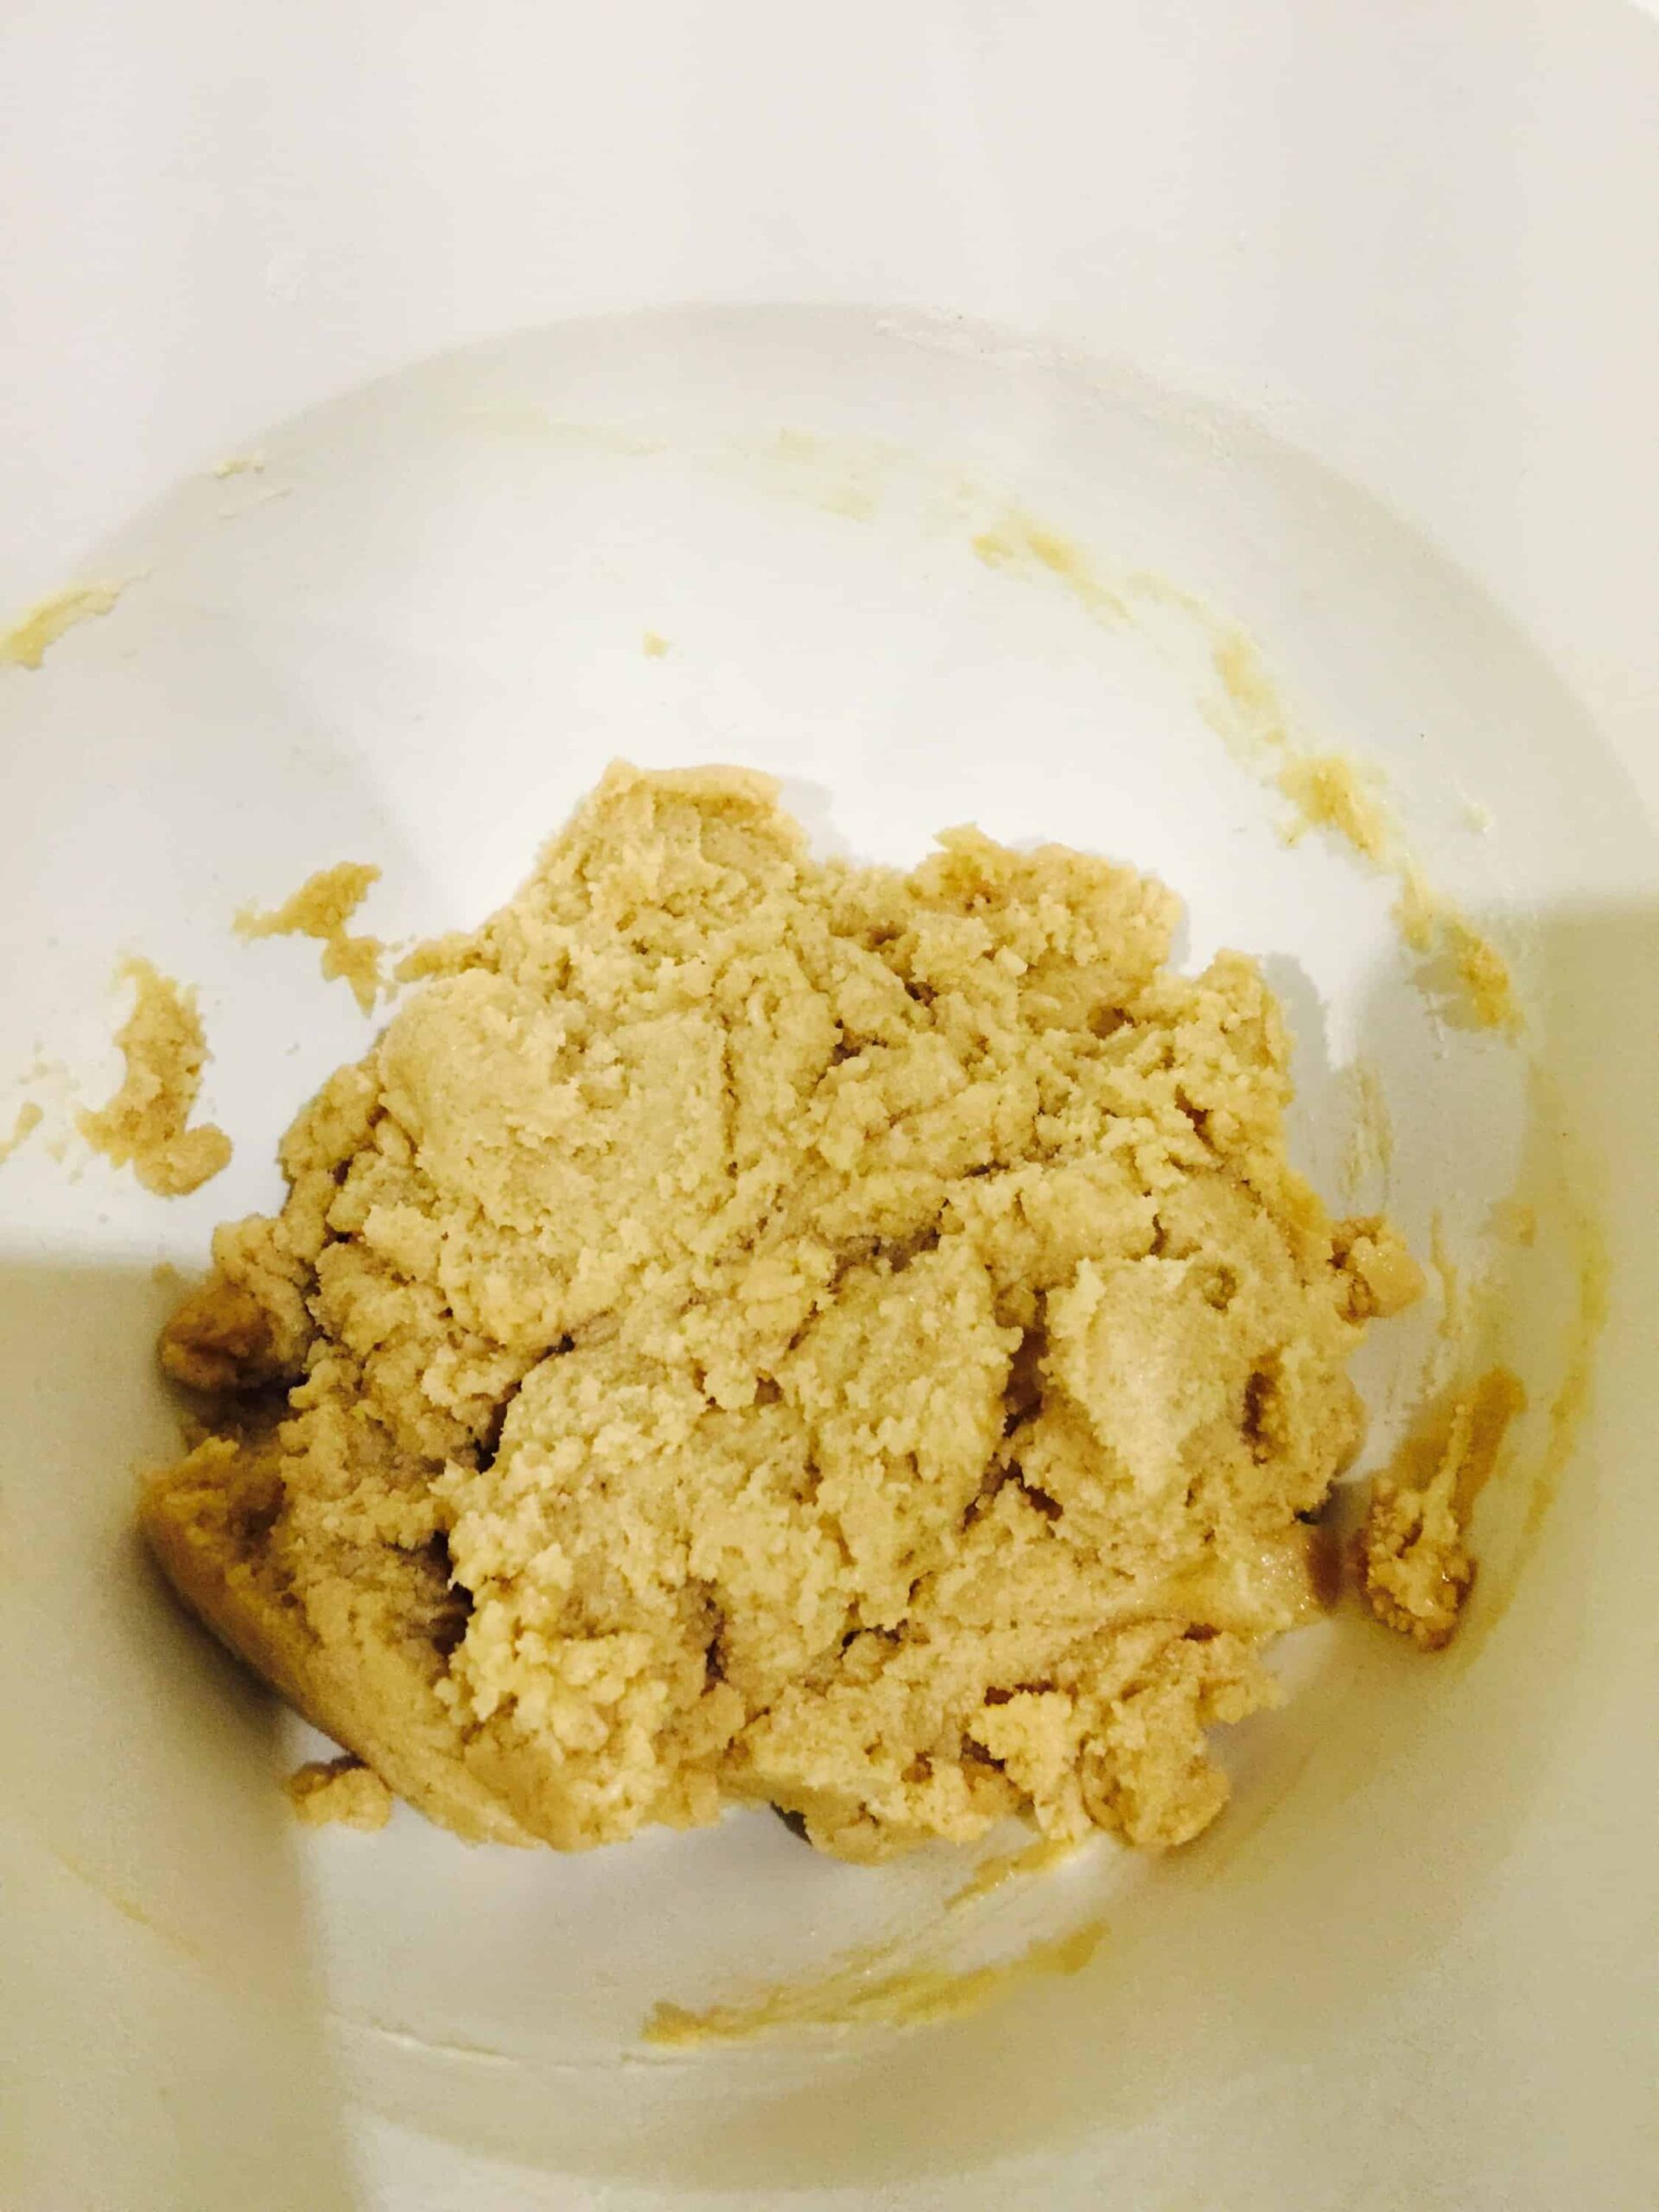
The process for this dough seemed pretty straight forward. Four easy steps! I could do this!

The instructions tell you to mix the dough using a mixer. I tried using a hand blender which was probably not the smartest idea I’ve come up with as it didn’t really work.
In the end I ended up using my hands. This seemed to work better as the heat from my hands helped mould and mix the dough.

The dough didn’t smell as appetising as regular pizza dough but I persevered anyway. It smelt a little like plasticine (it wasn’t an unpleasant smell).
As I followed the instructions, the dough didn’t come out as I’d have expected, I used a little more water to knead till it came out to a dough like consistency.

I tried to then roll out the dough on the work surface but failed as it began to break apart when I tried to transfer. I decided to roll out straight on to the pizza trays after lining with baking paper – this worked perfectly. I used my fingers to smooth out the sides.


I set the bases aside and placed a damp tissue over the top before keeping in a warm place for 40 minutes as per the instructions.


Once I’d put the toppings on (sundried tomato paste, red onion, pepper, sweet corn and mushroom topped with cheese and tomato) and placed in the oven I was a little apprehensive about how this was going to turn out to be honest!
As the pizza cooked, the house was filled with a delicious aroma. It smelt amazing!


I was so pleasantly surprised by how this turned out. It was one of the best pizzas I’ve made at home and although the texture of the dough felt dense, it was really light and easy to digest. It wasn’t soggy or moist, it cooked through really well.


If you like a crispy base, I’d recommend leaving the pizza in the oven for ten minutes once it’s cooked.

One box makes approximately 3 12″ pizzas. Preetam and I ended up eating a whole one to ourselves as it was so easy to digest!

This was definitely my favourite product out of the three I was asked to review and I would highly recommend it – especially for a bargain price of £3.00 (Tesco).

I’m so glad to have found a pizza base that doesn’t leave me feeling lethargic – I can now eat my favourite food without writing the whole evening off after!

I have teamed up with UDI to host a fab giveaway! Free food = win win!
Would you love to win this gluten free hamper full of delicious goodies?! It’s super quick and easy, you can find out more details here.
Disclosure: This product was received to review. All my opinions and beliefs about this product are honest and my own. This blog is solely written and edited by me. Harps x

Posted on 6 Comments

Vegetarian Healthy Sweet Potato, Bean and Carrot Fritters Recipe – BLW

Hello all! 

Here’s my recipe for super healthy vegetarian sunshine fritters which I posted on Instagram a few weeks ago. 

Arjun really enjoyed these and I hope your little ones do too! It’s super quick and easy to make. These vegetarian fritters are packed full of lots of goodness including good carbs, protein and vegetables. 

Time taken: 10 minutes

Makes: 30

Ingredients

  • 350g Sweet potato and butternut squash (I use Tesco’s pre cubed sweet potato and butternut squash mix)
  • 4 tablespoons mixed beans (I use Tesco’s four bean salad) 
  • 2 carrots shredded
  • 60g cheddar cheese
  • Pinch of red chilli 
  • Handful of coriander (or to taste) 
  • Handful of cornflour 


Method

1. Cube and steam the sweet potato and butternut squash for 5 minutes. I know it’s lazy using pre cubed food, but in my defence it was a weekday and I had a long day at work! I cooked this as per the instructions by steaming for 5 minutes. 


2. While the sweet potato and butternut squash is cooking, peel and grate two carrots. 

3. Mash the four bean salad using the back of a fork or you can use a food blender. 


4. Once cooked, add in the sweet potato and butternut squash and mash. 

5. Mix in the cheese, carrots, red chilli and coriander. 

6. The texture should feel dough like but still steady enough to be able to pat in to small fritters using your hands. 


7. Coat in cornflour and shallow fry for a few minutes on each side until browned. 
Voila! 

  
Serving suggestion: salad, veggie sausage and sweet corn! 
  

Plate can be purchased Here (available in three different colours). 

For more information about our vegetarian weaning journey, click here.

Cheesy Greens Pasta Recipe

Disclaimer: as when trying any new foods with your baby that you may be unsure about, please check with your health visitor first.

X

Cuddle Fairy
Posted on 42 Comments

Arjun’s First Birthday Jungle Party … The Food!

I think it’s definitely safe to say there was no shortage of food! Most people left on their way in to a food coma! A happy and content belly is definitely a success in my book!

For the adults we had a catered BBQ by Masala Creations who we’ve worked with before – they are always so professional. I decided catered food would be best given the volume of guests. It also meant one less thing to worry about. Masala Creations took away all my worries and instilled me with the confidence that they’d take care of all on the food front. And they did. I dealt with Harpinder and Ruby who were really helpful. They did a site visit to walk through the day and were really great at reassuring me they were also there to support me as well as taking care of the food. That reassurance went a long way! 

We’re vegetarian and don’t drink alcohol so don’t serve meat or alcohol at our functions. The adult menu was:

Starters:

  • Paneer shashlik
  • Pizza samosas
  • Vegetable spring rolls

Mains:

  • Vegetarian burgers in buns
  • Chilli paneer
  • Chips
  • Noodles
  • Corn on the cob
  • Sweet potato
  • Garlic bread
  • Salad
  • Potato salad
  • Coleslaw

Dessert:


We were really pleased with the service. We’d hired four waitresses to hold the fort on the food side and to ensure plates and things were picked up as they were used. I didn’t have to worry at all about the adults being fed – it was completely taken care of. 

I decided to make the children’s food myself at home. I really wanted to present it beautifully and so focused my attention on that. The design and detail of the kids food was probably the part that I invested the most time in and I was so pleased with the end result! It was totally worth it! 

I created homemade signs for each dish (again all vegetarian food) by creating fun names for the food. I then included animal pictures on each and  backed each sign on to safari print card which I purchased here. I then folded over so that the signs were free standing. I love how colourful and vibrant they looked. 


I had created homemade safari table curtains for three round tables which were displayed next to each other to display the food.


 I purchased safari print wrapping paper which I used to wrap random boxes (thank you Amazon! Your giant boxes for the diddiest things came in handy!) to display the food on at varying heights. I ensured these were stuck down to the table and to each other with tape for health and safety reasons. This was probably my favourite bit – I’m so glad I’d thought of something to give the display height and even more colour!


I reused leaf shaped trays which were purchased for my baby shower. I love how effective they were at tying everything together and they kept with the theme and were the perfect size for the purpose. 
  

I also purchased inflatable palm trees, a zebra, a lion, a monkey and a giraffe to use for display around the kids food to bring it all alive. 
   

I purchased animal shaped plates for the younger babies and safari truck party trays for the older kids to eat their food from. I also purchased animal cups and straws and animal napkins for the children. There’s such a wide array of party supplies you can get, but this particular set was my favourite. 


My friend Sav and I used to do fruit displays for weddings and parties years ago and we decided to do a dinky one for the children at the party. It was so much fun to do a (much) mini, less stressful display after so long! Our fruit display skills came in handy after years! Here are a few pictures from weddings and parties we’ve done previously..


For the mini fruit display, I carved a hippo head out of a watermelon which was filled with cantaloupe, papaya and watermelon balls, a crocodile out of pineapples and kiwis, papaya baskets filled with green and red grapes, and “palm trees” out of pineapples. My friend Sav also helped to create strawberry and pineapple and cheese “hedgehogs”.


In addition to the fruit, the children’s menu consisted of:


  • Chocolate Cheetah/Jammy Giraffe/Cheesy Snake Sandwiches: chocolate spread, strawberry jam and cheese sandwiches using assorted animal cookie cutters to shape the sandwiches in to safari animals.   
  • Snake Spiral Pasta: tomato fusilli pasta.  
  • Elephant Trunks: Bird’s eye veggie oven cooked fingers. 
  • Cheetah Chicken Nuggets: Oven cooked Quorn nuggets.   
  • Cheeky Cheetah Waffles: Oven cooked carrot and potato waffles purchased from Asda kids range.  
  • Monkey Smiley Faces: Oven cooked McCain potato smiley faces. 
  • Parrot Pizza: Oven cooked Tesco’s cheese and tomato mini pizzas.   
    • Tiger Tails: Wotsits
    • Critter Crunch: Quavers
    • Zebra Chips: Tortilla chips  
    • Roar Vegetables and Humous: Humous with sliced peppers displayed in the shape of a lions head.   
    • Jungle Fruit Display: as detailed above 🙂
    • Lime Slime: mixed jelly   
      • Hungry Hippo Hummous Dip
      • Big Bear Breadsticks
      • Cub Corner: For new eaters, I had Ella’s Kitchen pouches and Organix crisps  
      • Watering Hole: Drinks included Capri Sun, Fruit Shoots and bottled water.         

      For our gluten free friends, I had arranged for separate food to be made which included paneer, chips, corn on the cob, and gluten free pizza. 

      I hired mini children’s tables and also purchased safari themed activity placemats for the children which you can read more about here


      In addition to the above, we also had a crepe and waffle stall, a slush puppy stand and a hot dog stand. The ice cream van we hired also went down a treat!


      Hope you loved our food ideas as much as I enjoyed planning them!x 
      Next post to follow: The Party Bags

      You can also check out my Pinterest board for more of my favourite party ideas!

      Want to read about the rest of Arjun’s first jungle themed birthday party? Check out the following posts in the series:

      The Build Up
      The Decor
      The Outfits
      The Cake
      The Entertainment
      The Food
      The Party Bags

      Baby Brain Memoirs
      Modern Dad Pages

      Mummascribbles

      Modern Dad Pages

      Brilliant blog posts on HonestMum.com

      Cuddle Fairy
      Posted on 9 Comments

      Chilli Paneer Recipe

      Paneer is one of my most favourite foods ever! It’s strange because before Arjun, I liked paneer, but I wasn’t totally crazy about it. During my pregnancy, cheese became my favourite thing (fab for the weight control!) and my love for cheese hasn’t really dissappeared! Especially paneer. 
      This deliciously succulent paneer recipe is my favourite so far. The paneer oozes flavour and the crunchy vegetables command their own.


      I’ve included the baby friendly version of the recipe at the bottom so your little ones don’t miss out on the goodness!


      You could miss out the shallow frying step but I’ve always found that coating the paneer before mixing it in the marinade really makes a big difference. The flavours come thorugh a lot stronger and I also prefer the texture.


      Time taken: 25 minutes prepartion, 15 minutes cooking.


      Ingredients:

      · 8 cloves garlic

      · Ginger – I used a generous piece a little bit bigger than the size of my baby finger

      · 3 green chillies

      · a heaped tablespoon of cornflour

      · 1 red onion

      · 1 red pepper

      · 1 green pepper

      · 1.5 packets cubed paneer

      · 170g chopped tomato 

      · Tablespoon tomato purée

      · 8 table spoons of Maggie seasoning

      · 1 table spoon of tamarind sauce (I use ready made)

      · 1 tablespoon of Maggie chilli and garlic sauce

      · 1 teaspoon masala

      · 1 teaspoon soy sauce

      · ½ teaspoon red chilli powder

      · 2 teaspoon haldi 

      · 1.5 teaspoon salt

      · 2 teaspoon ground coriander

      · 1 teaspoon ground cumin 

      · Chopped fresh coriander (to taste) – I used a handful as I love coriander!


      1. Mix together the garlic, ginger, green chilli and cornflour. Toss the paneer in this mixture coating it.

      2. Shallow fry the paneer for a few minutes, mixing the pieces every so often so that they get cooked evenly.

      3. Chop the red pepper, green pepper and red onion in to medium sized strips (mine were about 2cm long).

      4. Blitz the chopped tomatoes in a food processor and then mix the fresh tomatoes, tomato puree, Maggie seasoning, soy sauce, tamarind sauce, red chilli powder, Maggie chilli and garlic sauce, masala, haldi, salt ground coriander, ground cumin in a large bowl to prepare the marinade. Mix well.

      5. Next gently mix in the paneer in to the marinade coating evenly.

      6. Finally, mix in the prepared vegetables.

      7. Tip the mixture in to a large baking dish – I used a Pyrex dish and then sprinkle with the fresh coriander.

      8. Bake for 15 minutes at 180c.  

       Voila!


      Baby Friendly Recipe


      Ingredients:

      · 1 clove garlic

      · A small piece of ginger

      · A third of a green chilli

      · a tablespoon of cornflour

      · 1/8 red onion

      · 1/8 red pepper

      · 1/8 green pepper

      · 100g cubed paneer

      · 30g chopped tomato 

      · Teaspoon tomato purée

      · A pinch of masala

      · A pinch of red chilli powder

      · ¼ teaspoon haldi 

      · ¼ teaspoon ground coriander

      · ¼ teaspoon ground cumin 

      · Chopped fresh coriander (to taste)


      Method: as above.


       Serving suggestion: in a tortilla wrap/pita bread with mixed salad and mint chutney.


      Enjoy!x

      Tasty Tuesdays on HonestMum.com

      Posted on 12 Comments

      Scrummy Eggless Nutella Chocolate Chunk Cookie Dough Sandwich Recipe

      OMG. Heaven on a plate. This was absolutely delicious and my favourite Nutella dessert to date! It was my first time making it and I was a little apprehensive that it wouldn’t work given I was modifying an amalgamation of several recipes plus with the added complication of making it eggless. But it turned out perfect and our friends loved it too! I hope you love it just as much as we did!

      It was like a party in my mouth … the gorgeous gooey Nutella goodness with a scrummy cookie crunch.


      Time taken
      : 15 minutes prep, 30 minutes cooking time


      Ingredients
      :

      • 1/2 cup softened butter
      • 1/2 cup light brown sugar
      • 1/3 cup white sugar
      • 2 teaspoon vanilla essence
      • 1/8 cup sparkling water
      • 1 cup plain flour
      • 1/2 teaspoon bicarbonate of soda
      • 1/2 cup roughly chopped up milk chocolate (I used dairy milk)
      • 1/2 cup Nutella
      • A pinch of salt

      Method:

      1. Preheat oven to 180c and line a 8″ round baking tray with baking paper. I used a silicon tray but still lined with baking paper as it made it easier to lift the cookie.

      2. In a large bowl, whisk together the brown sugar, white sugar, softened butter, vanilla essence, bicarbonate of soda, salt, flour. Add in the sparkling water and mix till you get a cookie dough like texture.

      3. Once combined, line half of the broken up chocolate pieces in the baking tray and take half the cookie dough mixture and spoon in to the tray distributing evenly with the back of a spoon or with your fingers.

      4. Melt the Nutella in the microwave at full heat for 30 seconds.

      5. Pour the Nutella over the cookie dough in the baking tray but leave an inch around the edges.

      6. Finally, pat out the remaining cookie dough in your hand to the largest circle you can before placing over the Nutella and evenly distribute using the back of a spoon or your fingers. Then distribute the remaining chocolate chunks evenly over the top.

      7. Bake in the oven for 30 minutes and cool for 10 minutes before serving.

      Serving suggestion: serve warm with with vanilla ice cream topped with drizzled Nutella and chopped toasted hazelnuts 🙂

      x

      Free From Farmhouse
      Posted on 9 Comments

      Eggless Nutella Brownie Recipe

      Hello all, 

      As requested, the recipe for eggless Nutella brownies. The substitute product for egg in this recipe is low fat Greek yogurt.  

      The brownies came out quite fudgey and I had good feedback on them. They were super quick and easy to make too! 

      You can modify the amount of Nutella and sugar you put in to this recipe according to taste. I’m a Nutella addict so the more the better! 

      Time taken: 30 minutes
      Ingredients

      • 1 1/4 cup Nutella
      • 1/2 cup all purpose flour
      • 2/3 cup brown sugar 
      • 1/2 cup plain low fat yogurt 
      • 1/4 cup roasted chopped hazelnuts 

      Method
      1) If you are using a non silicon one, grease a 8 x 8 inch baking tray. I used a silicone one so didn’t need to and got mine from here. Preheat oven to 180c. 

      2) Mix all ingredients in a bowl using a large wooden spoon until the batter is smooth. 


      3) When ready, pour mixture in to baking tray using a spatula or the back of a spoon. 

      4) Top generously with chopped hazelnuts. 

        
      5) Bake for approximately 20 minutes or until a toothpick comes out clean when inserted. 

      6) Once done, leave to cool before slicing up and consuming! 


      Enjoy!x

      Tasty Tuesdays on HonestMum.com

      Free From Farmhouse
      Posted on 19 Comments

      Eggless Spinach, Broccoli, Pepper and Cheese Muffins Recipe

      Hello all, 

      I’ve had lots of requests for the recipe for the Eggless Spinach, Broccoli, Pepper and Cheese Muffins I made last week so here it is! 

      I was originally inspired to try muffins for Arjun by Habiba over at Eat, Write, Be. I decided to adapt the recipe to make it eggless and also added extra vegetables.


      Plate can be purchased Here (available in three different colours). 

      Age: 9 months plus (once your baby is eating solids)

      Makes: 15 mini muffins 
      Time taken: 30 minutes

      Ingredients:

      • 1/2 red onion, chopped
      • 1tsp butter
      • 175g plain flour
      • 1¼ tsp baking powder
      • ¼ tsp red chilli powder
      • 125g cheddar cheese, grated
      • 100ml full fat milk
      • 2 tbsp plain natural yoghurt
      • 2 cubes spinach and broccoli purée (approx 4 tbsp)
      • 1/2 red pepper
      • Handful chopped spinach 
      • Black pepper to taste 


      Method: 

      1) Heat butter in pan and shallow fry onions and peppers until soft. Add in the spinach and broccoli purée and cook for a few minutes and then leave mix to one side. 

      2) Pour the milk and yoghurt into a bowl and whisk to combine.

      3) In a another bowl, mix the flour, baking powder, red chilli powder, black pepper, chopped spinach and cheese. 

      4) Pour in the milk and yoghurt mixture and whisk together until you get a thick doughy mixture. 

      5) Pour the mix into your mini muffin tray and bake for approximately 20 mins at 180. 


      Serving suggestion: three bean and sweetcorn salad, baked beans and guacamole. 

      Arjun enjoyed his dinner at his teddy bear picnic in the garden. 

        
      As you end up making a batch of about 15 with the above recipe, as suggested by Habiba, I decided to freeze the batter as opposed to the muffins. I cooked 6 – enough for Arjun’s dinner and lunch the following day and froze the rest in an Annabel Karmel by NUK Food Cube Tray so it’s easy to defrost as and when I need to. 

      Enjoy!  

      For more information about our vegetarian weaning journey, click here.

      Cheesy Greens Pasta Recipe

      Disclaimer: as when trying any new foods with your baby that you may be unsure about, please check with your health visitor first.

      Baby Brain Memoirs

      Tasty Tuesdays on HonestMum.com

      Free From Farmhouse
      Modern Dad Pages